Sugar Bytes Turnado
- April 30, 2018
- by Frank Heller
- Product Intelligence Report
Sugar Bytes’ Turnado is an interesting take on a multi-effect plug-in. It provides 24 effect modules that can be assigned to a total of 8 Effect slots, essentially the mixer for these 8 selections. It should be noted that there are always 8 effects present in the Effects Slot area that can be turned on or off via a slot’s Main Knob or bypassed with a small LED-type button. Depending upon how any given effect is set up, the Main Knob can act as a switch or variable assigned effect parameter control and/or a combination of both. Depends on the programming.
The 24 effects provided cover a broad spectrum of functionality, neatly laid out in Delay, Modulation, Reverb, Transformation, Amplifier, Loop, DJ Tools and Filters categories. It’s a really nice mix of stuff.
Turnado additionally provides an automation sequencer section for the 8 Main Knobs, called Dictator. This permits control over the 8 Main Knobs with a single fader.
Presets can be saved or recalled globally, as well as sub presets for the individual effect modules and the Dictator. Additionally, it is possible to store Presets into a special MIDI Programs folder that will permit MIDI program changes to be automated in the host DAW.
All of the knob and slider controls may be MIDI CC assigned. A MIDI track will need to be created to direct MIDI controllers to the plug-in.
The layout
The layout of the GUI is pretty straightforward. Shown below is the main page, centrally displaying the 24 Effects Selections on the left and 8 Effect Slots with associated Main Knobs on the right. Above that is the Preset menu selector, a Wet/Dry slider, a Settings menu selector and the Dictator Selector.

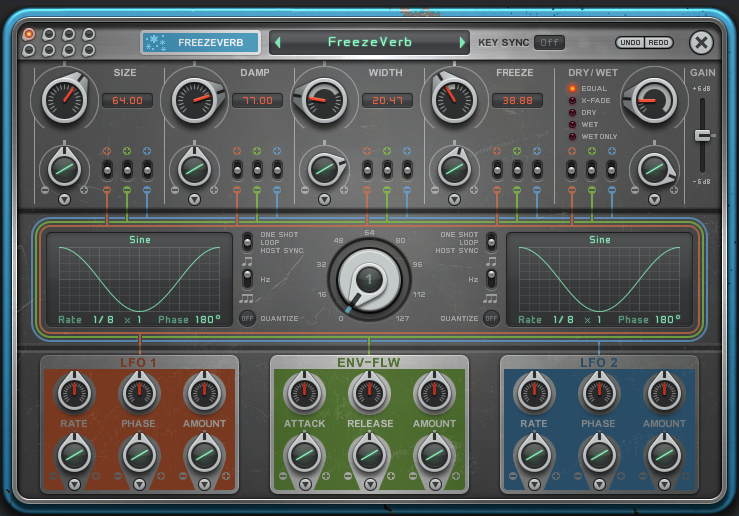
Clicking on any of the Edit buttons in the Effect Slots brings up the Editor for that effect. Shown below is the edit view with a FreezeVerb effect chosen:
Figuring out how it works:
Like a lot of people, I started clicking and turning knobs like a monkey. I soon discovered that this isn’t really the best way to go about finding out what Turnado is capable of doing. I say this because of the first thing I encountered: the behavior of the Main Knobs. I immediately assumed these were simply volume knobs. They can be, but it really depends on how the Amount controllers are set in the Edit view. The Amount controllers can be recognized by the little green “curve” in their centers and menu pulldown arrows below them. Depending on how things are set, the Main Knobs can behave like a switch or a variable control…or a combination of both.
This brings me my first suggestion for starting out, before you open the manual: Get a couple of different source materials ready in your DAW, like a pad, drums, vocal and a full mix snippet for good measure. Activate Turnado into an effect return and assign all your track’s sends to feed the plug-in. This way, you’ll be able to quickly test how different audio flavors react in the various effect modules. Additionally, you may want to set up a MIDI track for your controller of choice, outputting CC data to Turnado.
My second suggestion is: once you’re set up, work with one slot in edit mode and test each effect by clicking on the Effect menu to the right of the Preset selector and then run through the factory presets to get a feel for how they sound and how they were programmed. There is a Main Knob in the center of the editor that duplicates the Main Knob on the Main Page (with the exception of the Bypass Switch). The position of the Main Knob makes a huge difference in how any particular effect, and associated preset, will react when you turn it from fully off to fully on, or anywhere in between.
What I’m getting at is that Turnado is deceptively deep. You really need to get get a handle on how controls and sub-menus interact within the interface. This is one of those plug-ins you can easily get lost in if you don’t grasp how the controls are tied together. It’s also one of those plug-ins you can easily get lost in tweaking the amazing number of parameters provided.
In my opinion, the GUI doesn’t provide enough of a visual clue as to how the modulation flow functions. The feed to the Switches are clear enough. It’s the relationship as to what happens between the Main Knob, Effect Parameter Knob and its Amount Controller that were initially confusing to me. It was only by experimenting with the controls that I got a clear idea of what’s going on. This is indeed a plug-in that wants to be played with to uncover its many capabilities.
I felt this point was important enough for me to provide a couple of illustrations to give you an idea of the basic hierarchy of the editing controls and how they interact. I took the time to do this because the interface and the manual are not very tutorial-ish on basic signal flow. These small examples should provide enough insight as to how most modulation paths work, beyond some of the more the obvious elements.
Two modulation examples:
This first set is to show the Main Knob controlling the Wet/Dry knob via its Amount knob to make the Main Knob act as a simple volume control:

This second set shows how the LFO 1’s upper manual Amount knob affects the target’s range and how the target’s Parameter knob can introduce an offset to the modulation swing.
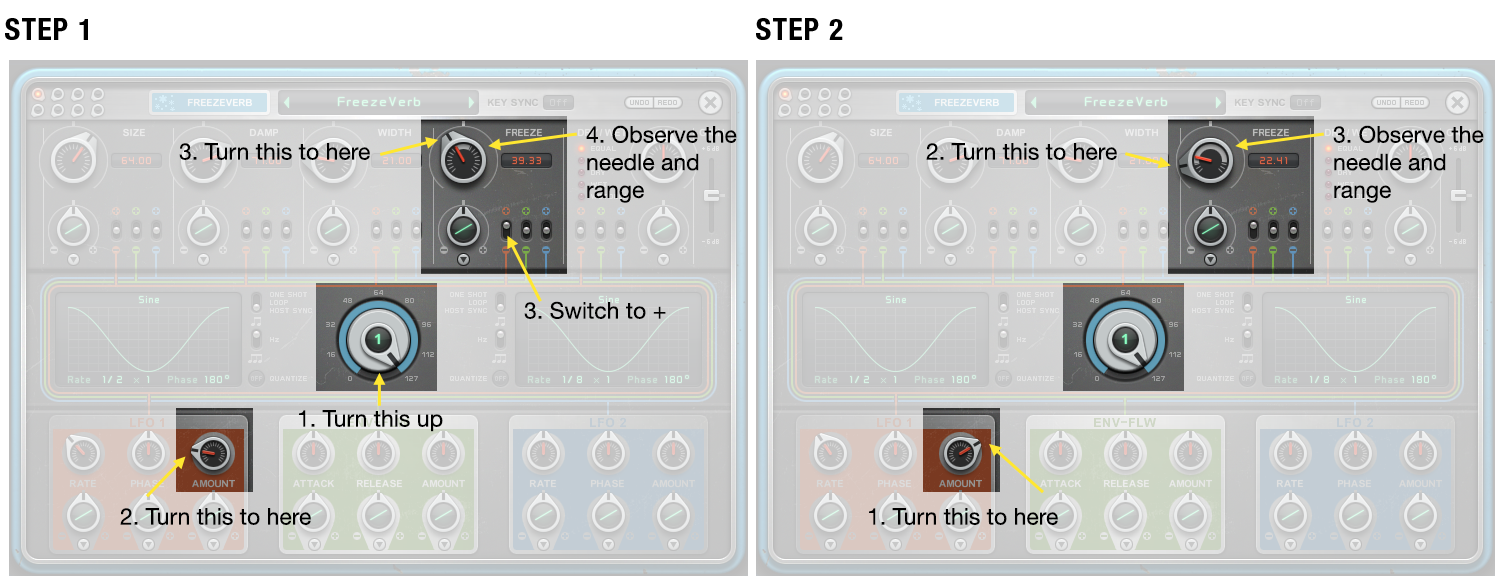
One other thing of note. The Amount Controller knobs have response curves associated with them. These curves are how the Amount Controller knobs respond to movement of the Main Knobs only. You can easily see this at work by changing the curve in example 1’s Dry/Wet Amount Controller knob to something like one of the stepped curves and then rotating the effect’s Main Knob and observing the result.
Amount Controller Knob curve selector:
The pulldown provides 20 transformation curves which influence the response of the controller to Main Knob movement. To quote the manual: “These curves offer a range of transformation patterns allowing modulation to occur at a later point in time, stop intermittently, follow steps, or follow logarithmic and exponential curves”. That seems pretty clear.
Edit Page Modulators:
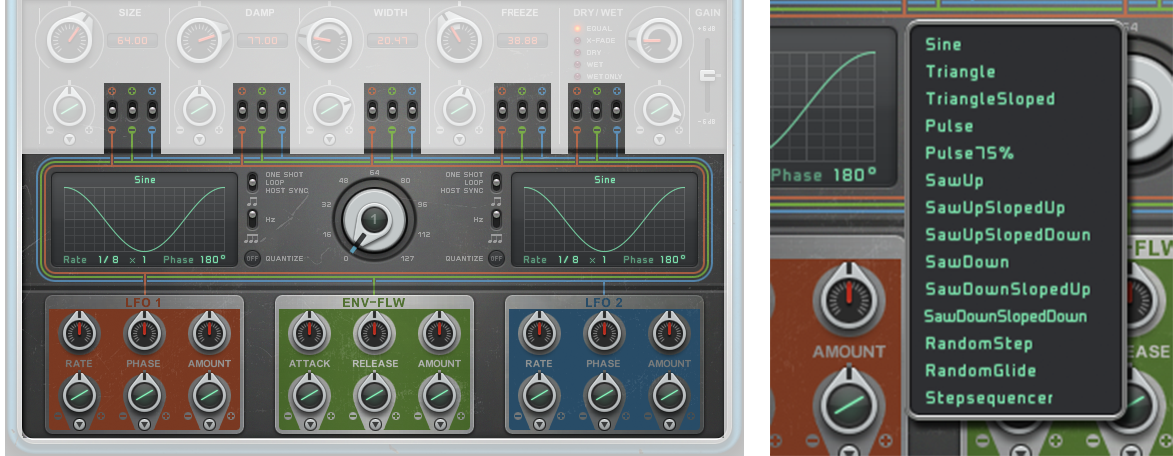
Turnado provides 3 modulators per effect: 2 LFO’s with Rate, Phase & Amount, and an Envelope Follower with Attack, Release and Amount controls. The LFO’s can be one-shotted, free-looped or host sync-looped.
The Dictator
Turnado provides an automation sequencer of sorts named: “Dictator”. It’s funny, I looked online for user-type information on this feature and they all pretty much came to the same conclusion: you really should play with this thing to figure it out. There isn’t much help in the manual on the subject. The manual’s choice for a starting preset doesn’t exist and it took me a while to find one that made understanding this feature, a lot clearer. I discovered there was a functionality change in how the intensity’s range is set. It was switched in the what the manual described as a mouse drag to: hovering over an upper bar and mouse-wheeling. That threw me for a while.
Basically, this feature uses a single fader to jump through timing and level settings for all 8 Main Knobs. I think you’ll need to set some time aside for experimentation. It really could use a few GUI improvements to help predictability.
So, how good are the effects?
I’d like to start by saying that all of the effects available sound and perform quite well considering the tiny CPU usage footprint his plug-in uses. They all pretty much do what’s on the tin and there’s enough info in the manual to get you through some of the less conventional functions.
In addition to overall Presets, each Effect Module provides its own separate Preset manager. This is a great place to start to find out what each effect is capable of doing. The selection of presets per effect isn’t huge, but the choices really do show off the possibilities. I was able to figure out how everything worked by rolling through these while changing source material to match in. Some effects work best with sustain-like material while other work better with drums and “full mix” looped material. This is important to know because many of the modules depend on reading the audio before they can do what they’re supposed to do. Where you start playback determines how these effects grab onto the audio to do their work. Your DAW’s play button is your best friend here, in these cases. Otherwise: expect the unexpected.
What makes Turnado a standout is the ability to modulate all of the parameters, either manually or via CC or DAW-based automation. It’s the movement that’s possible that make this an incredibly fun toy to play with. And I don’t mean that in a novelty way. You can get some seriously sophisticated sounds going with this plug-in.
Turnado’s manual does an excellent job of describing what each and every effect does. For the purposes of this article, I would suggest that you download the demo (which includes the manual) from Sugar Bytes and check it out yourself, here: https://sugar-bytes.de/turnado
Small Example:
Just for giggles, here’s a small demo of the “Tonalizer” module. The first 4 bars are dry, the second 4 use it on the melodic synth and the last 8 add it to the drums. The fact that you can get the delays to follow musical timing and scaling choices is just wonderful.
Frank’s Nitpicking
Sonically, there is nothing I can really nitpick with Turnado. It’s some of the interface choices (or lack thereof) that could use some addressing.
- The GUI is about 25% too small for my taste. It’s a bit on the tiny side and can be hard to read unless you’re pretty close to the screen. Bigger would give text a chance to breathe and be seen easier.
- If ever there was a plug-in that cried out for contextual help, this is it. Anything that keeps me from slogging through a manual is always welcome.
- Many of the controls have no value readouts. The Main Knob, in particular, suffers from this. I wanted to experiment and come back to the original setting and could only do it haphazardly because I had no idea what the target value was to be. This plug-in could benefit from either a global value display parked up in the menu bar or a contextual readout as you click and drag on an object. Takes the guesswork out of repeatability and accuracy.
- 3 out of 20 Panlooper presets actually perform some type of modulated panning. It would be nice if there were more modulated examples showing off what the effect’s name implies. Sure, some of the names are cute…but in the case of Factory presets, I’d prefer if developers used more descriptive names. Not a big deal but every little bit helps.
Frank’s Wish-List
- I wish Turnado had the ability to mod key/click on a knob or fader to make that control jump to the position the cursor is pointing at. I can’t tell you how many times I wanted to get specific control jumps to happen while automating. This would also be a boon for Dictator use.
- Sugar Byte’s website provides a number of Turnado quick tutorials. However, the manual could stand to use some signal and modulation flow illustrations to help in a tutorial-ish fashion. A few mini-tutorials (“try this” examples) in the manual wouldn’t hurt here either.
- The Tonalizer could use left and right channel mutes.
- What I’d like to see is being able to name and save a Preset directly to any one of the folder selections within Turnado’s Preset menu.
- I wish the manual’s installation was directed (at least on a Mac) to Users/Documents. I say this because I’m not big on installing stand-alones. I don’t use them at all and I like to keep my Applications folder as uncluttered as possible. Unfortunately, de-selecting the stand-alone in the Mac installer installs a folder into the Apps folder anyway, where the Manual is deposited.
- I wish there were more diagrammatic explanations in the manual. In spite of the manual’s Wet/Dry mix selection definitions, I was still unclear as to how some of the signal flow was working.
Overall
This plug-in is big fun. A little cryptic in areas, but fun nonetheless. Easy on the CPU…. a big plus. It’s modulation abilities make a lot of its “standard” type effects come alive. The plug-in also supports NKS…good news for those of you using Native instruments hardware.
Author

Frank Heller
Recording Engineer/Producer from 1970-2000. Digital Interface designer for Mackie Designs from 1998-2006. Digital Artist for Symetrix Inc. 2006-2017. 21 gold & platinum albums, and 2 Grammys somewhere along the way. Lifelong Cubase user and a real stickler for reasonably designed plug-ins.
Presently owner of Weasel-Boy Recording in Seattle.
He's worked with Producers such as Amir Bayaan, Marley Marl, Bruce Forest and Arthur Baker.
He's also worked with Artists such as New Kids on the Block, Madonna, LL Cool J, Stevie Winwood, Earth Wind and Fire, New Order, Prince and Jimmy Cliff.